The problem
Our organization has multiple deployment environments (e.g., Development, Testing, Production) and utilizes separate API Management instances for each environment. These instances can be shared by multiple development teams, who are responsible for different APIs and may have different release cadences. We also need to have a record of deployments and approvals and to tie those to work items. As a result, we needed to determine the best and safest way to automate deployment of APIs into API Management through Azure DevOps.
Assumptions
- You already have at least 2 APIM instances created in Azure (test and prod, for example)
- A storage account exists in your destination resource group
- Your DevOps project has a service connection to the Azure subscription or resource group
- You have downloaded the Azure API Management DevOps Resource Kit to a working folder
The Solution
Part 1 - Building and Exporting the APIs, Generating the ARM Template
- In the first (origin/dev) APIM instance, developers would make the desired updates using the UI in the Azure Portal
- Capture the newly applied changes by running Azure API Management DevOps Resource Kit extractor tool against the first APIM
- Open the extractSettings.json in your working directory (containing the Resource Kit). Make the modifications to fit your environment. Setting splitAPIs to true will assist with deployment later.

-
Open PowerShell and navigate to <working directory>\azure-api-management-devops-resource-kit-master\src\APIM_ARMTemplate\apimtemplate. Run these extractor commands:
                                        az login

                                        az account set --subscription <your subscription id>

                                        dotnet run extract --extractorConfig "..\..\..\extractSettings.json" (adjust your folder format accordingly)
NOTE: If APIs have been deleted from the portal since a previous extract, you will need to make sure their folders are deleted in your local repository before running additional extracts, to avoid re-deploying them.
- The result is a set of folders, one for each API, in an APIM folder (as specified above). There is a master ‘apim-master.template.json’ ARM template file in the root that can be used to deploy all the APIs. There is also a master template in each folder for deploying them individually.
- At this point you could deploy the ARM template to the new APIM, but our experience was that the deployment process would fail (due to dependency issues) if they APIs were not deployed sequentially.
We created a Dependency Fixer script that will loop through the master template and add the dependsOn attribute and appropriate folder considerations, enforcing a sequential deployment.
- Edit the script to adjust the variables to your folder structure
$templatePath = "..\APIM";
- Open PowerShell as Administrator > run the dependency fixer script
NOTE: it may be necessary to allow the script to run with “Set-ExecutionPolicy Bypass”, and then setting that back to default afterward.
- Your code is ready to be committed and pushed to your Azure DevOps repo
Part 2 – CI / CD Pipelines
For demonstration purposes, this is broken into both a build and a release pipeline, but it can easily be compiled into a single yaml pipeline. I also had to recreate the APIM User Groups manually in the new APIM environment before the deployment would work. I need further testing to determine if that can be added to the template or not.
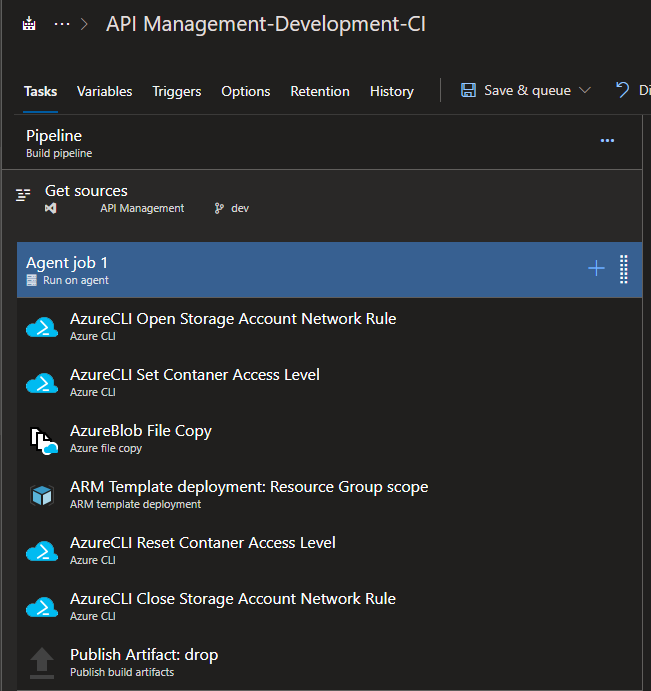
The purpose of this CI Pipeline is to validate the template that is created by the extractor and your code, and to copy the contents of the repo into an Azure storage account. We need to do this because, as of this writing, the following deployment task cannot directly access the raw files in Azure DevOps. The steps are as follows:

- We do not allow public/anonymous access to our storage containers, so we need to open those firewall rules for DevOps to be able to connect. First, we use an Azure CLI task to open the Storage Account to allow connections from outside the network
az storage account update --resource-group "<resourceGroup>" --name "<storageAccount>" --default-action Allow
- Then we grant public access to the container
az storage container set-permission --name <containerName> --account-name <storageAccount> --public-access container
NOTE: these should be locked down further with either IP restrictions or access keys.
-
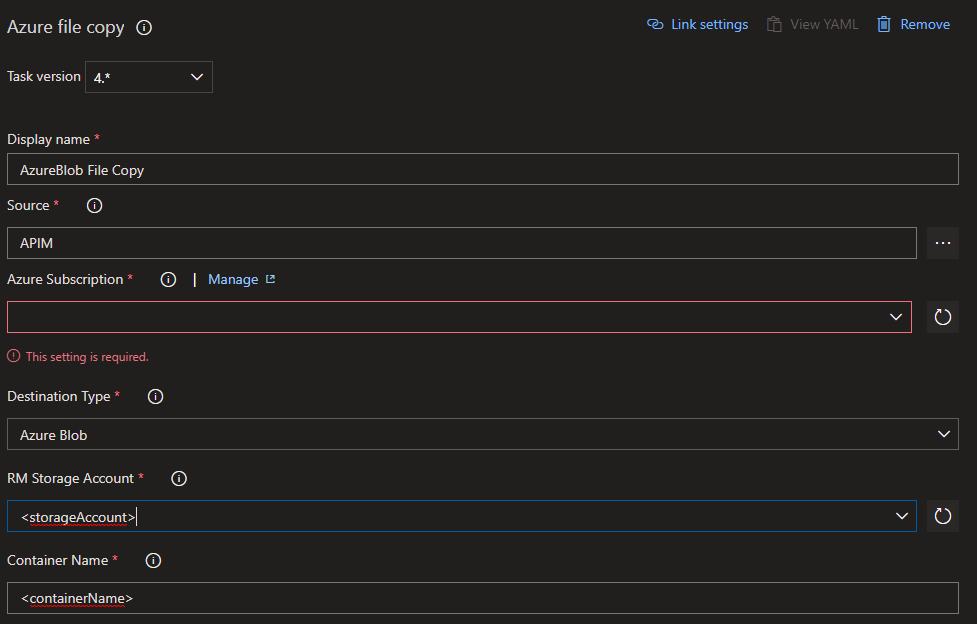
We then use an Azure File Copy task to send the files form the DevOps repo to the blob container.

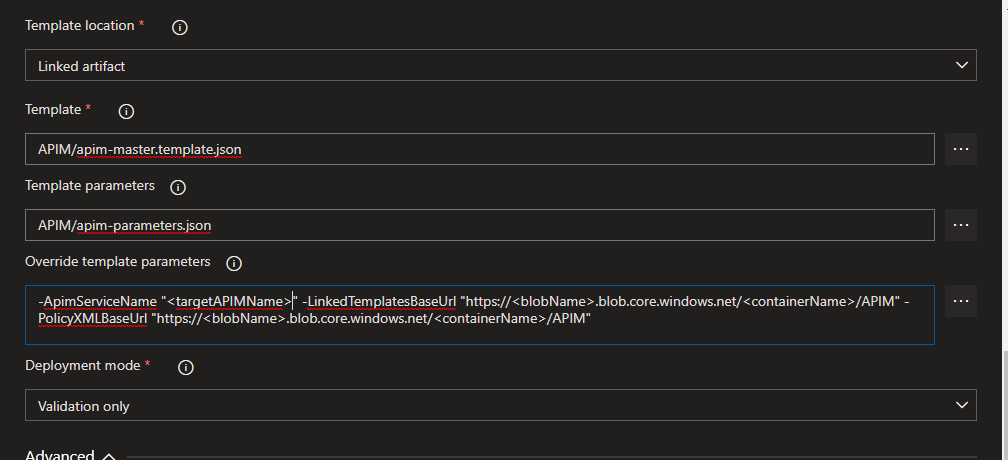
- Next, we run an ARM template deployment to validate the template. This isn’t entirely necessary but is a nice pre-check of the code.
- Template: Select the master template json from the root of your working folder; The file that the fixer script updated. This can also be a single master template, from a sub folder, for a single API deployment.
- Template parameters: Parameters template json from the same folder as the master.
- Override template parameters: provide the target APIM name, and the URL to the files you uploaded to the container in the previous step, into 2 different BaseUrl variables.
- Select the “Validation Only” Deployment mode.

- Close the firewall rules behind us by returning the container to private access
az storage container set-permission --name <containerName> --account-name <storageAccount> --public-access off
- Return to network access
az storage account update --resource-group "<resourceGroup>" --name "<storageAccount>" --default-action Deny
Note: both tasks should run even if a previous task fails
- Publish the artifact for the CD pipeline
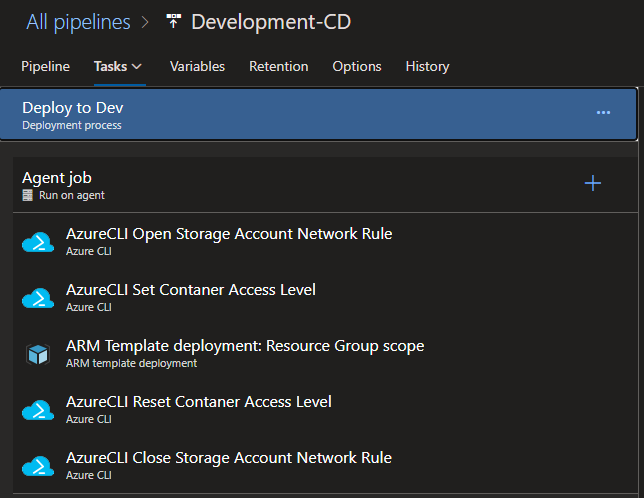
The CD Pipeline will deploy the APIs to the target APIM using the ARM template now stored in the blob container. A trigger could be set up to automatically run the release pipeline once the CI artifact is created.

- Again, grant DevOps access to the storage account and container
- Set the templates and parameters as you did earlier, except use the CI artifact this time, and be sure to select the “Incremental” deployment mode.
- The “Complete” mode will delete anything from your resource group not specifically metioned in the template

- Close the network rules behind you, as you had done in the CI pipeline
You did it! You should have now deployed from one APIM environment to another. Based on your configurations, there still may be some cleanup to do on the new environment, but this process should be repeatable as developers continue to add to your APIM capabilities.
|